

Bullfix Universal Plasterboard Fixing
Perfect for plasterboard or dot and dab walls of any thickness.
Bullfix Universal is designed for both plasterboard and dot and dab walls of standard thickness (between 12.5 mm and 16 mm). It can support weights of up to 113 kg (see Facts & Figures for details). It requires a cavity of only 7mm behind the plasterboard.
Our fixings accomodate a standard 5mm ø (or No.10) screw.
Solving the Challenge of Attaching Heavy Objects to Plasterboard
Bullfix Fixings are a simpler, smarter and stronger way of fixing heavy objects to plasterboard.
They were developed by a longer term builder who was frustrated by the existing fixings on the market.
Designed For Strength
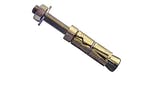
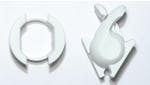
- Wings open behind the cavity to deliver support and amazing strength
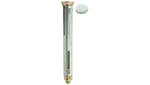
- Collar distributes weight and adds stability
- Cavity of only 7mm required
- Accommodates any 5mm screw (20mm screws provided)
- Supports up to 113kg per fixing
Ideal for Heavy Objects
Designed specifically to be used for heavy objects. You can be confident that whatever is installed will stay installed.
Number reviews: 18
Overal rating: 4
Review for Bullfix Universal Plasterboard Fixing by Westons
22nd February 2023
Im finding that once te hole is drilled the neck fits nicely but i have trouble getting the front part flat (of the fish shape) and end up just having to force it and its never flat. Its almost like its too big to open up flat. Any ideas in what im doing wrong please?
Review for Bullfix Universal Plasterboard Fixing by Stour Valley Plumbing
9th October 2022
Was a bit unsure of the quality of the fittings, so tried them to hang a large heavy Radiator at an empty house, expecting them to fail. Despite my scepticism, they worked well and held the heavy Radiator. I assume the product has been a success as I tried to buy more and they are out of stock. In summary , a very good product, well worth keeping in stock in the van.
Review for Bullfix Universal Plasterboard Fixing by D.A. Plumbing and Heating Ltd
6th September 2022
I was a bit dubious about trying these at first as I’ve had trouble with plasterboard fixings in the past. I tried these to hold a 1200 mm pan shelf after trying with the metal pigs tails which chewed up the plasterboard I was able to make the holes big enough to try these fantastic fixings. I will be keeping a few packs of these in the van and these will be my go to fixings from now on.
Review for Bullfix Universal Plasterboard Fixing by Bowden Electrical
29th August 2022
Tried these for the first time today. Fixing a 5ft mirror on a plasterboard wall. Marked it out, drill the hole using the supplied 20mm flat bit. First fixing in, followed by the butterfly fixing. Screw in,job done. Holds a hefty mirror with only 4 fixings. One downside is that they won't fix in a double lined plasterboard. Overall a great idea and going to use all this week for consumer unit changes.
Review for Bullfix Universal Plasterboard Fixing by Innswood Homes Ltd
10th August 2022
Gave a very strong fixing on a tv bracket, will definitely use again. Feel confident they could be used for radiators or other heavy items.
Review for Bullfix Universal Plasterboard Fixing by N.J.M Property Maintenance
10th August 2022
Absolutely amazing how good these work. Used plenty of plasterboard fixings over the years. But these will definitely be my go to option 100%
Review for Bullfix Universal Plasterboard Fixing by Shine Electrical (Leeds)
10th August 2022
There’s nothing I didn’t like about these fixings, successfully holding a light fitting nice and tight, it has 116 plastic balls (golf ball size ) and is a hefty weight, standard 12.5 mm plasterboard ceiling, even pulled on it to see if there was a chance of movement but that fitting isn’t going anywhere ! Will definitely be taking a stock case on the van.
Review for Bullfix Universal Plasterboard Fixing by LCP Plumbing Ltd
2nd August 2022
I tried to use these for pipe clips, but the screws were too short, I will try again once I have sourced some longer ones.
I don’t think the packaging is convenient particularly if you don’t use them all at once.
I didn’t find the instructions easy to understand so couldn’t work out how to set them up to pass through the hole
( maybe that’s just me)
I don’t know the cost so unable to comment on value for money
Review for Bullfix Universal Plasterboard Fixing by HarrysBlinds
2nd August 2022
Well worth the money - holding a 70” flatscreen which originally was going to baton the studs to get a good fix for but 6 of these are holding
Review for Bullfix Universal Plasterboard Fixing by SC Electrics
31st July 2022
A fairly simple product, easy to use and seems to have a good strong hold. A minor annoyance that they come in 2 parts as I know that I, along with every other tradesman on here, will end up with more of one part than the other, these excess parts will be destined to rattle around the bottom of a tool bag for ever more.
Although it comes with fixings, they will take a screw which is a nice feature.
The white colour is a benefit over the main competitor as it doesn't stick out as much.
The collar protrudes slightly from the wall which isn't an issue in most situations but can be a minor annoyance.
Well worth a try.
Review for Bullfix Universal Plasterboard Fixing by ATR Plumbing & Heating
31st July 2022
Took a while to figure out how to use them. Was installing a 1200mm wide double radiator so quite heavy. Must admit did not have total confidence they would support the radiator being made of plastic so also used my go to Brolley anchor fixings to be safe. IMO not worth the extra cost and potential callbacks will stick to tried and tested ways.
Review for Bullfix Universal Plasterboard Fixing by Bulldog Gas services
30th July 2022
Received a trial kit of these, just WOW… I hung a 1800 double panel radiator to a plasterboard wall, wasn’t sure how it was going to go but it’s solid, really easy to use, great how you can choose what size screws you can use, these will definitely be my go to fixing..
Review for Bullfix Universal Plasterboard Fixing by Eastside Electrical Services
29th July 2022
Well they said they were strong and they were telling fibs, I used these to hang a 65 inch TV to plasterboard and there was no problem at all. If I had to have one moan it's that they are not on piece as you have to fit the outer ring first but its a minor point. I think these are brilliant little fixings and tge fact the are short at the back will make them perfect for dot and dab walls
Review for Bullfix Universal Plasterboard Fixing by Sunderland Property Renovations Ltd
29th July 2022
When i first saw these fixings I was hopeful that they would perform better than others currently available, unfortunately in practice they are not intuitive to use,are a bit flimsy. I don’t think I would rely on them to hold the weights they suggest they can.
Review for Bullfix Universal Plasterboard Fixing by Gray's Plumbing & Heating GPH
29th July 2022
Just tried these the other day to install a radiator. The Inserts are pretty flimsy broke 3 in the space of 2 mins trying to figure out what way the fixing went in took around 10 mins to finally sus it out. Seemed ok once done but personally I think they should be made from metal so less breakage and more confidence in the security. Not for me unfortunately
Review for Bullfix Universal Plasterboard Fixing by JPC Plumbing and Heating
29th July 2022
Bullfix plasterboard fixings offer an excellenty alternative to traditional fixings. They are easy to install on both stud and dot and dab plasterboard walls. More appealing is their high load capacity which is great for hanging radiators etc.
These are a useful addition to anyones fixing collection.
Review for Bullfix Universal Plasterboard Fixing by Aes Electrical
29th July 2022
My honest opinion on the bull fixings is they are a good strong piece of kit but far to fiddly to install. There’s a lot of easier plaster board fixings out there.
Review for Bullfix Universal Plasterboard Fixing by AJ and Sons Plumbing Ltd
23rd July 2022
In my opinion, there is to much fiddling about, having to drill hole, then insert collar, then put locking supports in, I prefer another brand that's so much easier and quicker. Also the screw could do with being slightly longer
Number video reviews: 3
Hi, this is Andy Bennett from Bennett's Safe Gas. I'm going to be doing a review on these Bullfix Ultimate Plasterboard Fixings. I've seen them at the trade show in Birmingham. I believe Tool Talk have got a number of these to be testing. So, I'm going to be testing these.
Also, they've sent these out. These are kitchen hanging brackets. As you can see they're a lot bigger. I think it's to accommodate, because of the size of the hole you need, normal kitchen fixings are just there and that's a bit too close. So, they give these wider brackets. So, I'm going to try them out at some point. Yeah, and then I'll come back with a video of it done.
Okay. This is the pack of Bullfix Fixings for plasterboard. It comes with a 20mm spade bit. This is the starter pack. There's eight fixings in there, eight screws. This is the back. Just quick some instructions. Drill the wall, insert the collar, push in the fitting, tap the fitting into the wall sometimes, and then apply the thing that you screw into the wall. Simple.
Okay. Let's open up the pack. I'm going to take out the spade bit, put it in the drill. Okay. And we're just going to drill the wall. I have used these already, so I'm putting my finger in the wall to clean the back, it does help line it up and open up. Make sure there's nothing behind as well.
So you get the collar. That's it just there. Got some little blades on it that just hold it in place. It is very easy to fit when there's no plaster on the plasterboard and then you just get the fitting. And fortunately for me, this is just going to push straight in with my fingers more or less. There you go. Easy. Sometimes you do have to tap it with a hammer. Sometimes you do have to tap it with a screwdriver and a hammer. I am going to try later on with a 21mm bit to see if that helps a little bit.
So this is my mock up, just a bit of wood and a screw. Just going to screw that in. I'm just going to just do a stupid test, see how strong it is. No science. Let's just be rough with it. Let's try it with the hammer first. Yeah, that has not moved the fitting, it's just dented the wall in.
Let's just yank it off. It takes a lot of force. There you go. It has ripped off, which is exactly what I was trying to do, but the wood broke first before the fitting fell out. There it is. It is a strong fixing, much stronger than the pigtail ones we've used. I would probably guess that it is much stronger than the umbrella ones, but you do need more room with these ones. The umbrella ones don't take up as much room.
Okay. So let's take this back out of the timber and see what it's done to the fixing. So if you just pretend that was still in the wall and you just pull it out. Easy. You can reuse this again. Just to see if we can separate it, which we can. There you go. You can see inside, it's none, no damage. Just the screw thread has bitten into the plastic, which is exactly what you want. And then it will just click back together, roll around, drill another hole, push it in and away you go again.
So this is the fixing that goes into the wall and see some little blade that stops it spinning. It is strong enough. And what you do is you just push it through, tap it with a hammer, maybe a screwdriver and a hammer, and it will just open up just like that. And that gives you the strength at the top and at the bottom, and that's the amount it adjusts. What it doesn't do though, unfortunately, is it doesn't fit 9mm board.
Hi, guys. The guys from Expert Trades have sent us these out, these are Bullfix plasterboard fixings, to have a look at. So we're going to give them a go and see how they work and see how strong they are, and bear with me.
Right, so we've got our test sheet of dry wall. There is a reason there's plywood here, and you'll see why in a minute. Anyway, I'll drill the hole, we're using the drill bit that came with it but that's not what we're testing here. Right, so what we're going to do is, get one of these here out. It's a two part system. First thing we do, we've got a wee collar, that's the wee collar there. We're going to stick it in the hole. Which is neat, which isn't a bad thing, I suppose. Now this may not go in too well, because we are using wood, we're not using plasterboard, but we'll try it.
I'll get a wee persuader out. Yes, it's in. It goes in a lot easier into drywall, I'm sure. But this bit of wobbly plywood, doesn't like it too much. Just put the persuader back. Now, what we're doing now, make sure I get this right, as it's the first time doing it. We basically, put it in like that. Just put it in because there's a wee bit here, I'll show you this. Wee fins on them, and it opens up like that when you push it in. So let's try it here, push it in, put your collar on and like that, you just push. And it clicks in to place.
Now, to me, wee gentle tap again. That slips in quite easily. And it is protruding a wee bit. It's not as bad as another brand we tested recently. Now I'm going to get a screw. No I'm not, the screws come with it, wee bolts. And we'll get one of them out.
Problem with these packages, once you've opened them you lose where everything is. So I'm trying not to open it the whole way. And we're going to... Oh actually, no, I'm not. I'm not going to use that again. Put a wee screw in, and just drive it home. And that holds. That does hold and it does seem quite strong, especially on the plasterboard.
Did find that on the plywood, and I think it's because of the thickness of it, that it won't hold unless you break it before... It'll break the fitting before it breaks anything else, so it is quite strong. I've got a good bit of strength on it, especially forced down. They're not a bad wee fitting. They're not too overly expensive, it's a good wee pack. Give them a try, see what you think.
Hi guys, Tony Lewis, A.L Plumbing and Heating. Going to do a little review on the Bullfix Fixings today. These ones are the dry wall ones, but the ones I'm actually going to be using are for a cavity wall. I'll get them out and we'll have a look.
These are the cavity wall fixings. They're fairly similar. They've got the shroud for covering the hole that you'd drill. The hole you'd drill is a 20mm hole, which fortunately it comes with the fixings, which is great. The cavity wall fixings are quite a lot larger, I suppose, because you've got the space in the back to get them through, so that's good. You can see they're going to give a good, solid fixing on the back of your board when you've got everything in place. Did that wrong hang on.
When they're in place, they're going to be good. They do give you a screw, which doesn't look to be that good or that strong. The head looks quite small and quite flimsy. I don't know if you've got anything that's got quite a large head, you might have to get a washer. A large fixing hole, you might have to get a washer to hold that because it's quite a small head screw. And we'll see how strong it is when I try putting them in the wall.
I've drilled the hole in the wall already with the 20mm bit that's supplied with the fixings. We'll see how they look. There's the hole, here's the fixing. Going in. Just get my hammer for a bit of gentle persuasion. They go in simple enough.
The fixings have gone up and just give them a bit of a tug now. That's pretty solid. I'm quite happy with that. I don't think they're going to come off in a hurry. Yeah, quite pleased. Good fixings. The only thing I do say, as I said, the screws were quite small heads, so probably not the best of screws, but all in all, good fixing. Good and solid. Do what they say on the tin.
No questions